
| |
Products |
| Hints & Tips | |
| Photo Gallery | |
| Chat Boards | |
| Recipes | |
| Free Stuff | |
| Fishing Links | |
| Tackle Auctions | |
| General Site Information | |
| Contact Us | |
| Check E-mail | |
Scanning Tips
This page is not a complete guide on scanning images. It is here simply to give you some basics on how to scan images to be published in the Hall Of Fame and save you a lot of time when trying to E-mail an image.
The first thing to consider is what resolution (Dots Per Inch - DPI) to save your picture at. As the image is being displayed on a monitor via the Internet it can only be displayed at 75DPI on the vast majority of monitors set at 800 x 600.
The second thing to consider is the actual size of the image. The maximum recommended width to display images in the Hall Of Fame is 400 pixel's. This way they fit into this space provided and do not take too long to download.
If you scan a 6 x 4 photo at 100 dpi it would have the following size.
(6 inches x 100 dpi) x (4 inches x 100 dpi) = 600 x 400 pixel's
You can then crop, resize and resample the image once you scan it, more on this later.
When referring to image size for viewing on monitors it can only be discussed in Pixel's. A pixel is a dot on your monitor, a 800 x 600 monitor resolution is made up of 800 pixel's horizontally and 600 pixel's vertically.
The red line below is 400 pixel's wide by 5 pixel's high at 72DPI. If you view it on the same monitor at 800 x 600 and then 640 x 480 the actual length of the line would appear longer on the 640 x 480 setting but it would still be 400 pixel's wide x 5 pixel's high. It would be half the width of the screen at 800 x 600 and just under two thirds of the screen at 640 x 480. Hence why you always talk in pixel's when talking about displaying on monitors.
![]()
The third thing to consider is what format to save the image in. As it is a photograph we are using this example for and viewing it on the Internet the best format is JPEG or JPG (.jpg extension).
I find it best to scan an image at a higher resolution then I intend using it and then change the resolution (DPI) and size afterwards. This results in a larger image but gives you more flexibility to cut/crop, etc. You get a lot better results by shrinking an image than you will ever get by trying to enlarge an image.
Scanning at higher resolution (DPI) will require more memory though.
(6 inches x 200 dpi) x (4 inches x 200 dpi)
= 1200 x 800 pixel's
and the memory cost is:
1200 x 800 x 3 = 2.88 million bytes.
The last "x 3" is for 3 bytes of RGB colour information per
pixel (24 bits).
It is also a good idea to save on computer resources by only scanning the section of the photo you wish to be published. For instance the photo may be 6 x 4 but the section of you and the fish may only be half of the photo, so just scan that section.
Here is a small pic of the original 6 x 4 photo I will be using as the example.
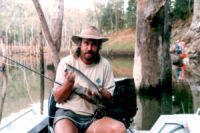
The actual size of the image as shown is 200 x 133 pixel's at 75DPI. It is about 10K in file size. As you can see there is a lot more on the photo than I want so I will only be scanning the section of the person and the fish.
How you do this will vary depending on the scanner software you have. I first preview the image in my scanner software, then roughly select the area of the photo I wish to scan. Then I adjust the brightness and other settings as required and set the Resolution to 200DPI.
Then scan the image, this will then display the image in your photo editing software. I use Photo-Paint 8.0 by Corel, but there are many others available, see below for some others.
Then crop the picture so you only have what you want displayed.
Then resample the image. Resampling allows you to change the actual size of the image and the resolution. This is called different things in different software programs. Set the width to 400, the height should adjust automatically, and set the resolution to 75DPI.
Note: By just zooming in or out of the picture in your editing software does not change the actual size of the image, only the displayed size. You need to Resize/Resample the image.

I now have an image that looks like this, although larger.
Now the image has to be saved. As mentioned earlier we need to save the image in JPG format for viewing on the Internet.
To do this select File - Save, File - Export or File - Save a Copy, depending on your software.
Select JPEG (JPG) from the Type drop down, type in the name you wish to save the file as and select OK.
Depending on your software you will have the option of compression, select 20, or in programs such as PhotoShop, select 8. The compression on JPEG images allows you to dramatically decrease the file size without effecting the quality, unless you compress too much.
|
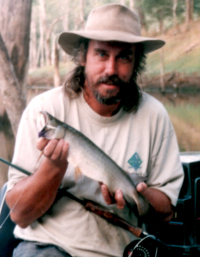 |
| Compressed at 20 File size 14K |
Not compressed File size 66K |
As you can see by the above example there is basically no noticeable loss in quality on the compressed image but the file, and therefore the download time and E-mail time, is dramatically reduced.

The actual size of the image as shown is 400 x 513 pixel's at 75DPI. It is about 39K in file size. A lot faster to E-mail and download over the Internet.
Paint Shop - By Jasc Software Inc. 30 Day free evaluation. Download from http://www.cnet.com
Corel Photo Paint - By Corel
For more detailed Hints N' Tips on Scanning checkout http://www.scantips.com

Products | Hints & tips | Photos | Chat Rooms | Recipes | Free Stuff | Links | Tackle Auctions
All information and images on
this site are subject to Copyright
© 2000 ausfish.com